


Can you imagine creating your own escape room? I am not necessarily talking about creating an escape room for business purposes, more like turning your home into an amazing experience that your loved ones will remember forever.
If so, you are in the right place, because I can share with you some tips on how to make a DIY escape room in your home.
First of all, let’s make it clear, it’s not going to be as easy as it seems, just scatter a puzzle here and a puzzle there, and you are done. No, no, my friend, it takes much more than that, it’s more like taking your creativity to the next level while doing it with a whole lot of love. I’m not gonna lie, it requires a lot of time and energy, but trust me, it’s worth every second of it.
My first escape game was a real blast. It took me almost a month of thinking, searching, creating, buying some stuff, and setting all of it up in my living room, but when it came down to the actual playing, I felt like the Superman of the Game Masters. Actually, it was a surprise party for my escape room crew, and btw, I’ve played many escape games with them.
Interested in hearing all the details about this room? Buckle up, let’s take a ride through the world of Game Mastery!
How to Make Your Own Escape Room
First, let me set the backdrop. That year I was my girlfriend’s Secret Santa (she is a part of the escape room crew) and I already had two tickets to Milan as a present for her, but wanted to find a special way to give her the present. That’s when I came up with the idea of an escape game, where the ultimate goal won’t be necessarily escaping the room, but finding the hidden mysterious treasure – the tickets to Milan.
So I knew that my storyline had to be connected to Italy, Milan. That’s the first thing you need to do when creating an escape room.
So let’s start with the first step!
1. Create a good storyline
In my case, the storyline was finding the hidden treasure in the mysterious castle of Milan, but you can come up with a bunch of different themes. For example, if your gift is a Harry Potter Hogwarts Battle Game board game, your theme can be the storyline of the game. If you bought a new pair of Jordans for your kid, the theme can be the Space Jam movie and so on… Just think of something that your kids, family, or friends are going to love, and make a great short story out of it.
For example, you can check the storyline of Houdini’s secret room (which, by the way, is a ready-to-play escape room kit that you can play right away), or download the whole game preview.

I guess you’re thinking “well I am not a novelist, how could I make this kind of story?” Don’t worry my friend, I am sure you can do it, just unleash your hidden creativity and follow these few steps:
- It has to be a short story. Nobody wants long and boring stories. Anything that takes more than 2 minutes to read is a long story. Just keep it around 200 words and you’re good to go. Short stories mean more pressure, though, because each paragraph, sentence, and word is more important than they would be in a longer one.
- Add some mystery. Kids and adults tend to love mystery and fantasy and have an innate sense of wonder over the world. Mystery adds more flavor to the story, it allows us to escape reality.
E.g. Walking around, your curiosity leads you to a secret room, one in which no one has set foot in over a century. - Put some pressure. Escape rooms are all about testing problem-solving abilities against the clock. Giving them a deadline for solving the puzzles makes the game a lot more intense and fun.
E.g. As you enter the room, the door slams shut, leaving you locked inside, while the walls start closing in slowly. You have 60 minutes before the walls crush you, so you better hurry up—the clock is ticking!
Like I mentioned before, use your creativity and you’ll come up with a wonderful storyline, no doubt about it.
2. Create the Puzzles
Ok, you already have the story, but how can you create puzzles when you have zero experience? Well, it is challenging and time-consuming, but for me, it was the most fun part of the process. Believe me, there is a ton, a million ways to invent puzzles, some of them you can conjure up just by using things you already have in your drawers.
When I was preparing the escape room, I set myself one challenge, to use as many items I already have at home, with minimum purchases. Of course, I had to buy some cheap locks, chains, and other small stuff, but 90 % of the puzzles were made with stuff that I could find lying around the house.
First I categorized the puzzles from easy to hard. The last thing you want to do is create extremely easy puzzles or very hard ones. Either way is not going to be fun for the players. You need to find something that is challenging but at the same time something that anyone can solve.

It is also important to find puzzles that match your storyline. For e.g. If your storyline is about “Escape from the Dracula castle”, you should use some old-school puzzles (like paper, locks, chains, scissors, keys, text mirroring, invisible inks, wooden boxes, etc.). It won’t be suitable to use smartphones, internet, digital watches, and other modern technology. That’s like mixing two different styles. Old-school puzzles can be even more interesting than using apps and another tech.
Are you wondering what kind of puzzles I made? Click here to see all of them, in no particulate order (putting them together and making them functional is explained in the next chapter).
3. Putting the Puzzles together
Ok, so one thing is to decide what kind of puzzles to use, another thing is to make them functional, and a totally different thing is to put them together in one continuous game. This is the hardest part, it requires attention to detail and it consumes a lot of time. It’s like you have all the bricks and now it’s time to build the house.
Actual escape rooms go through a lot of testing and modifications before they are ready for the public. But for this one, you only have one chance to make it work. Probably you are not going to test the game before your loved ones get to play it. That being said, have in mind that you must minimize the possibility of making an error. The best way to do this is to create an organizational chart or simply grab this ready-to-play escape room kit.
If you decide to brave the odds and make it yourself, let me give you some tips on how to do it.
The next picture is of the organizational chart for the game I made. Making this kind of chart gives you a perspective on how to create the game flow and properly connect the puzzles that you have created. At this point in time, you may have to make some modifications to the puzzles, but don’t worry, that’s totally normal. You won’t change the core and functionality of the puzzles, but you’ll work out some minor details that help you to put them together as one game.
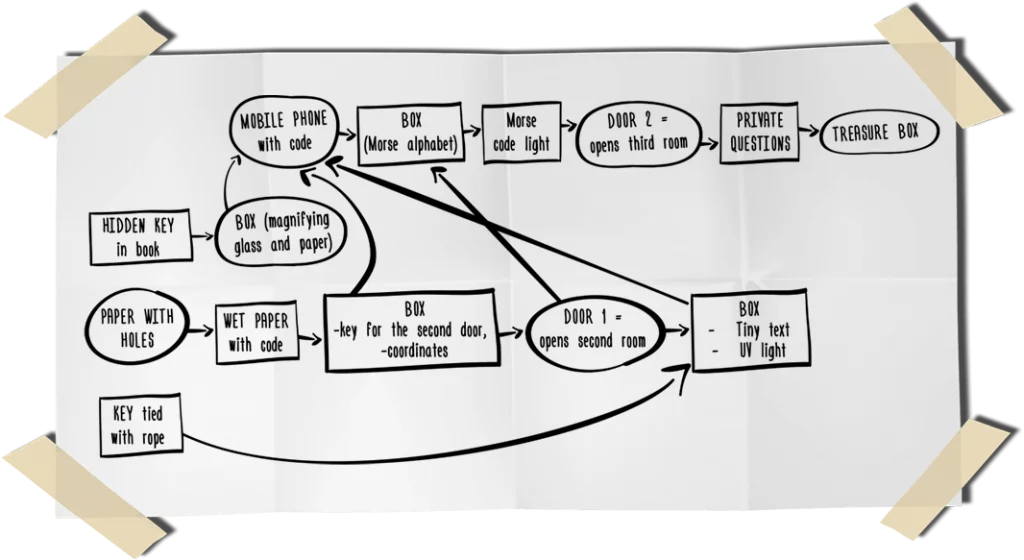
As you can see in my organizational chart, it is a nonlinear game, which means that I connected multiple puzzles that lead to solving the next one.
Unlike linear games, in this case, everybody takes action at the same time and there is no alpha dog that takes all the credit for solving certain puzzle. The players are working simultaneously on different challenges, and they can switch places at any time if someone gets stuck. This way is more fun for everybody because every single person has the opportunity to make a contribution to reach that ultimate goal.

Make sure that, during the game, the players have no chance of skipping some of the puzzles. For example, if they open the box with the Morse alphabet before they manage to unlock the cell phone, all previous challenges are worthless and don’t need to be solved. Just make sure that everything goes according to your scheme.
And don’t think your troubles are over once you’ve created the scheme. You may have the perfect plan on paper, but you also have to make it functional for the room. This part is challenging and it requires attention to the smallest detail.
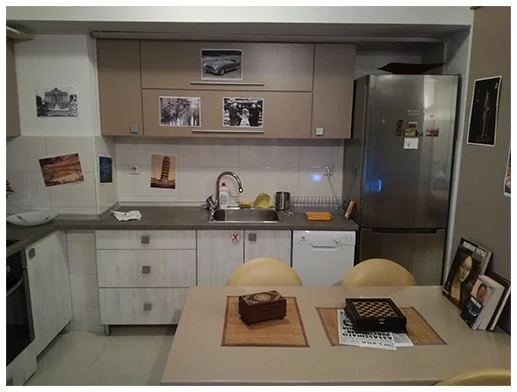
Clear out the space where the game will take place
All objects that are not part of the game shouldn’t be in the room. If you leave a lot of false clues, the players will get lost in space and time. Imagine leaving 20 books on the shelf and none of them is part of the game. Players will start checking every one of the books until it becomes so boring for them.
Eventually, they will lose interest in the game, and instead of being super fun, your game will become super exhausting and monotonous. That is why we created Houdini’s secret room as a board/escape room hybrid game that can be played just on one table, as well as in the whole room/apartment.
Make a check list
Trust me, you are going to need a long checklist, because there are so many details you will need to pay attention to. My advice is to divide the tasks into two different categories: regular tasks and last-minute tasks.
The regular tasks can be prepared hours or even days before the guests come to your escape party (like locking the boxes with clues and hiding the key in the book). But some of the puzzles have to be done right before the guests arrive. For example, setting the Morse light code has to be 5 min before the game starts, because otherwise, the cell phone battery won’t last a whole hour.
Make sure all the details of the game are included in your checklist if you want to minimize the possibility of forgetting something.
Don’t forget to prepare hints for some of the challenges that might prove problematic. When they ask for a hint, do not elaborate on the topic, but prepare short hints like riddles (you can even come up with some rhymes as we did in our ready-to-play Houdini secret room game).
Making your first home escape room is time and energy-consuming, but in the end the reward is unparalleled. If you really love this kind of games and want to make a special night for the people you love, just go for it!
4. Make it more special
Don’t forget that these games are all about the experience, not just the puzzles! When you are all done with setting the clues and the puzzles, sprinkle in more fun! You already feel like the greatest game master ever, because you’ve already figured out all these challenges and you connected them into an amazing escape room!
Now it is time for the icing on the cake, woohoo!
With a little more effort, you can make your game even more amazing.
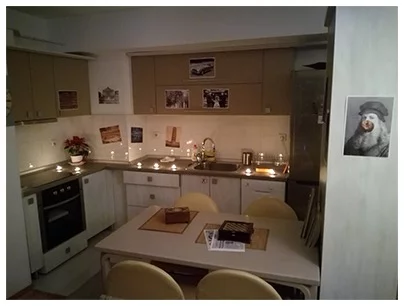
- Play background mysterious music;
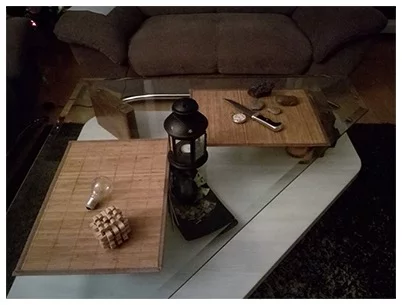
- Turn the lights down low and put some candles around;
- Get toys/items that suit the storyline (ex: for the space jam storyline, get some Monster toys, bugs bunny, Tazz, MJ jersey, a basketball ball, etc.);
- Put up posters around the room;
Serve some drinks and snacks. The game tastes better this way!
Make digital invitations and send them to the players via social media platforms. You can even go old-school and send the invitations via local post office; - Make a theme costume party. In the invitations, point out the dress code for the party. Trust me, if you pull this off it’s going to be the best party ever!
Our Ready-to-Play Game Kits
Pick a game, print, and play — it’s that simple!
-
Professor Swen’s Lab
Original price was: $24.90.$19.90Current price is: $19.90.Age: 9-1345-60 Min2-5 kids -


Leave a Reply